
THIS IS AN UPDATED VERSION OF Sitecore MVC Music Store TO MAKE IT WORK WITH THE OFFICIAL SUPPORTED MVC INSIDE SITECORE 6.6
In my last blog post about using the MVC Framework inside Sitecore, I announced that I’d write another blog post on how to actually create a real world application with MVC inside Sitecore. The first blog post was just a proof of concept, creating a real world application with it, helps completing the code.
Sitecore has announced that it will support MVC in Sitecore version 6.6. Great news! This tutorial will use the technical preview of Sitecore 6.6 to rebuild the mvc musicstore inside a Sitecore environment.
Since Microsoft has already created a nice tutorial for getting started with ASP.NET MVC : MVC Music Store tutorial. I figured it’d also be a nice tutorial to get started with MVC inside Sitecore. It’s an easy to follow, small tutorial, which makes it easy to go through for both experts and beginners in the world of MVC. Experts can just skip the parts explaining how MVC itself works and go straight to the action. For beginners, the entire tutorial takes less then 2 hours. It will be the best invested 2 hours of your programmer’s life so far :)!
Once you have completed the Microsoft tutorial, the steps in this blog-post will help you transform it to a Sitecore project.
Step 1 complete the tutorial
First, follow the entire tutorial (or if you’re an expert on MVC already, just download the package:http://mvcmusicstore.codeplex.com/)
Step 2 Get Sitecore running with MVC support
Follow the instructions given by John West to get Sitecore 6.6 with MVC support up and running.
Step 3 copy contents
Copy the wwwroot contents of the mvcmusicstore project into the wwwroot of an existing Sitecore project (or create a new one first), but SKIP the web.config files! Note that you should copy the web-files to the web folder of your sitecore project! (if you downloaded the package, the web-content is inside the ‘MvcMusicStore’ folder inside the zip file)
Now open the Sitecore project in visual studio, and add the project you just copied to your solution (File > Add > Existing project).
Step 4 connectionstrings
Copy the connectionstring in the web.config of the original created MVCMusicStore project, to the App_ConfigConnectionstrings.config inside your sitecore solution.
Step 5 Global.asax
Modify the default route in global.asax.cs. You can do that by adding any static string value in front of the default route. I chose ‘musicstore_api’. Doing this will make all your controller actions accessible through /musicstore_api/home/index, this could come in handy for stuff you need to access without going through sitecore (eg. ajax calls, delete actions, etc)

If you now run your application, and everything went fine, your application should show the default sample Sitecore homepage. If you now go to /musicstore_api/ , the musicstore should work exactly the same as when you finished the original tutorial. (Note: if you downloaded the sample code instead of making your own, and you run in to the error code ‘Unable to find the requested .Net Framework Data Provider. It may not be installed.’, you need to install MS Sql Compact CE 4.0)
These first 5 steps were the steps required to get an existing MVC application working inside the sitecore wwwroot. Now we’ll start modifying the existing app to become an application fully powered by sitecore!
Step 6 Create layout
In Visual Studio, copy /Views/Shared/_Layout.cshtml to /Views/Shared/_SitecoreLayout.cshtml
Open _SitecoreLayout.cshtml and replace 
with
In the Sitecore Content Editor user interface, navigate to the /sitecore/layout/Layouts/ folder that contains the default layouts. Underneath, create a new ‘Layout folder’ named ‘MVC MusicStore’. Now copy the ‘Sample layout’ item and paste it inside your newly created folder (using your right mouse button), name it ‘Shared layout’![image[2]](http://www.chrisvandesteeg.nl/wp-content/uploads/2012/07/image21.png "image[2]")
Having your newly pasted layout selected, go to the ‘content’ tab, and change the Path field to /views/shared/_SitecoreLayout.cshtml
Step 7 Create Sitecore templates
Run your application, and go the the Sitecore desktop (/sitecore/shell/default.aspx) and open the template manager.

Add a new template folder underneath ‘TemplatesUser defined’ called ‘MVC MusicStore. Underneath that new folder, add a new template.

Call the new template ‘Default page’ and just let the base template field as it is. Click next, next, finish.

Select your new ‘Default page’ item in the tree, and on the ribbon ‘Builder options’ click the ‘Standard values’ button in the template section.

And next on the ‘Presentation’ ribbon, click the ‘Details’ button in the layout section

This will open the layout details wizard:

Here, click the Edit-button under the ‘Default’ section (marked with a red border in the screenshot above), which will open the ‘Device Editor’ popup:

In the dropdown, choose the ‘Shared Layout’ the MVC MusicStore folder and click OK twice

Step 9 Register controller actions
Unfortunately, Sitecore does not automatically detect all controller actions and registers them as a rendering, like BoC.Sitecore.Mvc does. I will update BoC.Sitecore.Mvc ofcourse, to auto register all your controller actions, but for now, you will have to add them by hand.
In the Sitecore contenteditor, navigate to /sitecore/Layout/Renderings. Click the item with your right mouse button and choose Insert->Rendering Folder, name it ‘MVC MusicStore’. Inside that folder, add another folder ‘Home’. Click with the right mouse button on that Home item, and choose Insert->Controller rendering. Name it ‘Index’
Select your new rendering, and in the content tab, enter ‘Home’ as the controller, and ‘Index’ as the action.
Now you’ll have to do this for all actions wer’re going to use in this tutorial, your tree should end up like this:
Step 9 Create sitecore items
Based on our previously created ‘Default page’ template, we’re now going to add the Sitecore items based on this template.
Open up the content editor in sitecore, and delete the exiting homepage item (/sitecore/content/home). Add a new Home item by click the ‘Content’ item with the right mouse button and choosing ‘Insert > Insert from Template’.
Call the item Home and pick our just created ‘Default page’ template as it’s template
Using this same template, create the following tree inside Sitecore: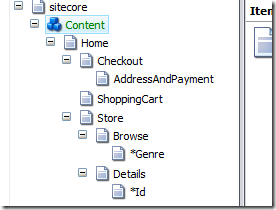
IMPORTANT Notice the * in front of Genre and Id!. these are wildcard mappings! The nameof the items should be * and the displayname *Genre and *Id.
Step 10 Attach controller actions
On these pages, we’ll attach the appropiate MVC Action. Start with the Home item. Click on it in the tree, and open the ‘Presentation’ ribbon. Now click on the details button:
This will open the layout popup
Now click the Edit-button under the ‘Default’ section (marked with a red border in the screenshot above), which will open the ‘Device Editor’ popup

Click the controls tab, and choose ‘Add’. That will bring up the ‘Select a rendering’ window.
Choose Renderings/MVC MusicStore/Home/Index and enter ‘main’ as the placeholder name (remember we added that $Html.SitecorePlaceholder(‘main’) to _SitecoreLayout.cshtml?). Click on Select, and then on OK twice to save all your changes.
Now do the same for all other pages you’ve created except the ‘checkout’ page (that is just a placeholder). The other pages should get the following controls:
- Checkout > Renderings/MVC MusicStore/Checkout/Complete
- Checkout/AddressAndPayment > Renderings/MVC MusicStore/Checkout/AddressAndPayment
- ShoppingCart > Renderings/MVC MusicStore/ShoppingCart/Index
- Store > Renderings/MVC MusicStore/Store/Index
- Store/Browse > Renderings/MVC MusicStore/Store/Browse
- Store/Browse/*Genre > Renderings/MVC MusicStore/Store/Browse
- Store/Details > Renderings/MVC MusicStore/Store/Details
- Store/Details/*Id > Renderings/MVC MusicStore/Store/Details
Step 11 Publish & test
Now, publish your entire site (! beware that if you’re using the sample database with the sample item template, that there is a worfklow attached to the new items by default! you need to approve them before publishing). After publishing, you can go checkout the homepage of your website. HEY! It’s just showing ‘default page’ ??
This is because by default, Sitecore holds a default.aspx in the root, and MVC by default does not trigger any route if the file exists on disk. You can enable routing for existing files by adding ‘routes.RouteExistingFiles = true;’ to the RegisterRoutes method in global.asax.cs, or you can just delete the default.aspx. I chose the latter one: just rename your default.aspx page in the root of your website’s folder to default.aspx.bak. Refresh your homepage.
Much better, but now what! the navigation menu and logo are shown twice!

Step 12 Modify viewstart
The reason for the page being displayed twice, is because the default MVC Musicstore project does not take into account that the views can be accessed as a child-action. Adding the actions as a sublayout inside our sitecore pages, makes the actions being rendered as childactions. To skip the layout being rendered in child mode, open Views/_ViewStart.cshtml and modify the one line that’s in there to:
(I do hope Sitecore will support ViewContext.IsChildAction, as that is the official way to check if your view should be partially rendered)
Save the file, and check the homepage again: Looking just fine now!
Step 13 Modify Links
Though the website looks good now, all links are pointing to the /musicstore_api folder. Even though that will work just fine, that’s the native MVC you’re calling then. To point all links to the sitecore versions, we’ll have to change all link renderings. This is the most dramatic change in an existing MVC application. In fact, we’ll break compatibility here, since the links will become Sitecore specific. I haven’t figured out a way to keep this compatible. Then again, I don’t think you’d ever even want that. Thing is, with a standard MVC application, a controller action always has it’s own url. With SitecoreMvc any page in Sitecore can use the same MVC Action over and over again, on different url’s. This is so different, it’ll be impossible to keep things cross-compatible.
First, we need to add 2 files to our MVC solution. One of the files will extend the default HtmlHelper with some extra methods to easily create links to Sitecore items. The other file will add support for wildcard items (remember that *Id and *Genre items you’ve created?). Download Extensions.cs and WildcardValueProvider.cs and add them to your solution (eg. in a Helpers folder) (these files will ofcourse also be part of the next BoC.Sitecore.MVC release, but we’re still working without external libs in this tutorial)
In your global.asax, register the wildcardvalueprovider in the application_start:
Now, go change all the links in the project!.
Open Views/Store/GenreMenu.cshtml. Modify the @Html.ActionLink in there, to the following:

See how we’ve mapped Genre as a parameter? The wildcard resolver will pick that up.
In Views/Home/Index.cshtml and Views/Store/Browse.cshtml change the action Url.Action to ![]()
This is the alternate method to set the wildcard item (*Id): by providing an anonymous object with the correct values
The Html.ActionLink in Views/Store/Index.cshtml to![]()
The Html.ActionLink in Views/ShoppingCart/CartSummary.cshtml to ![]()
In Views/ShoppingCart/Index.cshtml, change the $.post(“/ShoppingCart/RemoveFromCart” to![]()
(See how this will go directly to MVC! This won’t hit any Sitecore item, hence the url would become /musicstore_api/shoppingcart/removefromcart).
In the same file, replace the checkout Html.ActionLink with![]()
and the details Html.ActionLink to ![]()
In Views/ShoppingCart/Complete.cshtml change the Html.ActionLink to![]()
In Controllers/ShoppingCartController.cs, in the AddToCart method, change the RedirectToAction to![]()
and, the last one, in Controllers/CheckoutController.cs, in the AddressAndPayment method, change the RedirectToAction to![]()
Step 13 – Remove authorization
As a last step remove the Authorize attribute on the CheckoutController. In this tutorial, we’ll not be setting up Account related stuff, it’ll be taken care with in the follow-up of this post.

Step 14 – Run
Now run your project again! Everything but Account-related stuff should work fine now! Add albums to your cart, check out, etc.
Conclusion
That concludes this tutorial for now. It should give you a good idea on how to get MVC up and running for your Sitecore projects.In the next blog post about Sitecore & MVC, I will explain how to use the Sitecore security in this MVC Musicstore and we’ll get rid of the external database by creating Sitecore items for the albums. I will try to add the new Model’s feature in Sitecore 6.6 for that. The albums will the be editable using both the Sitecore content-editor AND page-editor.